
Fall is filter season in Phoenix. The pool worked hard all summer. The pump ran long hours, the monsoon storms blew in dust, and the trees dropped leaves and seed pods. Most of that dirt ended up inside your filter. Now that the water is cooling off, it’s the perfect time to give the filter a deep clean before winter.
If you have a cartridge filter, this guide walks you through how to clean it yourself. Then we’ll show you exactly how our techs do it on our customers’ pools, step by step, so you can see what a full, careful job looks like.
How to Tell Your Cartridge Filter Needs Cleaning
The pressure gauge on top of the filter is your best friend here. Right after a cleaning, write down what it reads. That’s your “clean” number. When the gauge climbs about 8 to 10 PSI above it, the filter is full and it’s time.
Other signs:
- The water flow from your return jets feels weaker than normal
- The water looks a little dull or hazy, even with good chlorine
- Your pool cleaner moves slower or stops getting around
- The heater shuts off or won’t stay lit, since low flow trips its safety switch
- It’s been more than a few months since the last cleaning
In the Phoenix area, most cartridge filters need a full cleaning every few months. Pools near open desert, construction, or a lot of trees need it more often. After a big dust storm, it may need one right away.
What You’ll Need
- A garden hose with a spray nozzle
- A wrench or socket that fits the bolt on your filter’s clamp band (some filters have a big screw-on lid instead)
- A rubber mallet (helpful, but not a must)
- A clean towel or rag
- A spare lid O-ring, if yours is old
Don’t use a pressure washer unless you really know what you’re doing. Up close, it can tear the fabric and wreck a cartridge in seconds. A garden hose with a good nozzle does the job for most homeowners.
How to Clean It Yourself
1. Turn off the pump. Shut it off at the timer or control panel. If your system has a heater, make sure it’s off too. Never open a filter while the pump is running. The tank is under pressure.
2. Let the pressure out. Open the air relief valve on top of the filter. You’ll hear air hiss out. Wait until it stops. The gauge should read zero.
3. Open the tank. Loosen the clamp band or unscrew the lid, and lift the top off. Set it somewhere clean. Be careful with the big O-ring that seals the lid. Don’t let it fall in the dirt.
4. Pull out the cartridges. Some filters have one large cartridge. Others have four smaller ones held in place by a top piece called a manifold. Lift the manifold off first if you have one, then pull the cartridges straight up. They’ll be heavy with water and dirt, so take your time.
5. Hose them off. Stand each cartridge up and spray from the top down. Work the water between every pleat. Spread the pleats apart with your fingers if you need to. Turn the cartridge as you go so you don’t miss a side. Keep going until the water running off is clear.
6. Rinse out the tank. Dirt and leaves settle at the bottom of the filter tank. Scoop out what you can, then rinse the inside with the hose.
7. Check the O-ring. Wipe the lid O-ring clean. Look for cracks, flat spots, or stretching. A worn O-ring is the most common reason a filter leaks after a cleaning.
8. Put it back together. Set the cartridges back in, then the manifold. Make sure the top edge of the tank and the O-ring are free of sand and dirt. Even one grain of sand can cause a leak. Set the lid on, put the band back, and tighten it evenly.
9. Start it back up. Open the air relief valve a little. Turn on the pump. Air will push out of the valve first, then water will spray out. When it does, close the valve.
10. Check your work. Watch the filter for a few minutes. Look for drips around the band and the lid. Then check the pressure gauge. It should be back to your clean number, or close to it.
Mistakes We See All the Time
- Opening the filter with the pump on. This is dangerous. The lid can blow off.
- Using a pressure washer up close. The pleats tear, and torn cartridges let dirt right back into the pool.
- Skipping the O-ring. A dirty or dry O-ring is why so many filters leak after a homeowner cleans them.
- Leaving sand on the tank edge. Same problem. The lid won’t seal.
- Forgetting the air relief valve. If air stays trapped in the tank, the filter can’t work right, and the pump may struggle.
- Waiting too long. A badly clogged cartridge is harder to clean, and the pump wears out faster pushing against it.
How We Clean Filters for Our Customers
That’s the basic version. Here’s what a full filter cleaning looks like when one of our techs does it. It’s the same job, but with a few more checks along the way. We do it the same careful way every time, on every pool.
Getting Set Up
Before anything gets opened, the tech walks the equipment pad. We confirm what kind of filter you have, since cartridge and DE filters come apart a little differently. We make sure there’s water at a nearby hose spigot. Then we shut off the pump so the system is safe to work on.
Our techs carry the tools for the job on the truck, plus spare O-rings and air screens. If one of those parts is worn out, we can often swap it the same day while the filter is already open.
Taking It Apart
We loosen the band bolt with a power tool, which makes quick work of bolts that have been baked tight by the Arizona sun. Then we lift off the lid and set it aside.
Before the cartridges even come out, we check two small parts that a lot of people never think about:
- The lid O-ring. We look for cracks, flat spots, and wear. If it’s not sealing well, it’s going to leak.
- The air screen. This little screen sits inside the tank near the top and lets trapped air escape through the relief valve. We make sure it’s there and it’s not clogged or broken.
Then we lift off the manifold and pull out the cartridges.
A Before Photo
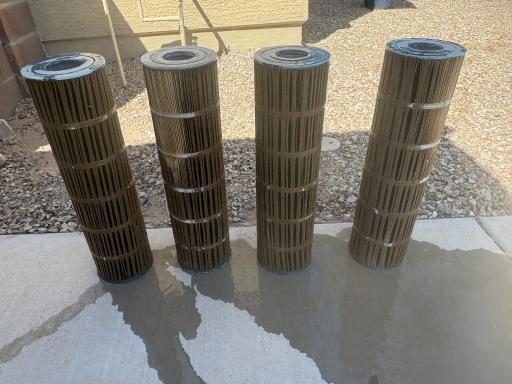
Here’s something most homeowners don’t expect. Our tech takes a photo of the dirty cartridges before cleaning them, like the one here from a real job. That way your pool’s service history has a record of how much dirt the filter was holding. It also helps us see over time whether your pool needs cleanings more often or less often.
The Cleaning
Our techs use pressurized water to blast dirt out of the pleats. That’s faster and more thorough than a garden hose. But pressure is also what tears cartridges, so our techs are careful to keep it at a level that cleans without damaging the fabric. This is the part where experience matters most.
Every cartridge gets cleaned on every side, top to bottom, between every pleat. No shortcuts on the back side.
Then we clean out the tank itself. We scoop the dirty water and debris out of the bottom, check the inside walls for buildup, and rinse it until it’s clean. A clean cartridge sitting in a dirty tank doesn’t do much good.
An After Photo and a Second Look
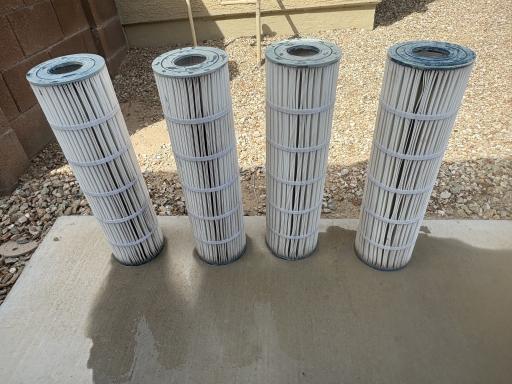
Once everything is clean, we take an after photo with the cartridges back in the tank. Then we look at the O-ring and air screen one more time. If either one is damaged and we have a replacement on hand, we swap it. If we don’t have the right part with us, we make a note and set up a time to come back with it.
Putting It Back Together
The cartridges go back in, then the manifold, then the air screen. We clean the O-ring and wipe down the top edge of the tank. Dirt and sand on that edge is the number one cause of a leaky lid, so we take our time here.
Then the lid goes on and the band goes back in place. As the tech tightens the band, they tap around it with a rubber mallet. That helps the band settle evenly all the way around, so the lid seals tight on every side instead of just where the bolt is.
Starting It Up the Right Way
We crack open the air relief valve on top of the filter, then turn the pump back on. Water fills the tank and pushes the air out through the valve. When water starts spraying out, we close the valve.
The pump runs for a few minutes while the tech watches every connection for leaks. Then we check the pressure gauge to make sure it reads where it should and everything is running right.
Before We Leave
We don’t call it done until the yard is too. We clean up the area where we worked. We roll up your hose and turn off the water at the spigot. Our goal is to leave your yard in the same shape it was in when we got there, or better.
What About DE Filters?
A lot of the same steps apply to DE filters. They come apart the same way, and we check the O-ring and air screen the same way. The difference is what’s inside. Instead of cartridges, a DE filter has a set of fabric grids coated in a white powder called diatomaceous earth.
When we clean a DE filter, we drain the old powder out of the tank before we pull the grids. That keeps old DE from clouding up your pool. After the grids are cleaned and the filter is back together and running, we add fresh DE powder through the skimmer. The amount depends on your filter’s size, so we follow what the manufacturer calls for.
If you’re not sure which type you have, our post on cartridge, DE, and sand filters shows you how to tell them apart.
Why Fall Is the Best Time
Summer is the hardest season on a filter here. By October and November, most filters in the Valley are packed with a summer’s worth of dust, pollen, sunscreen, and body oils. A deep clean now gets your filter ready for the cooler months, when the pump runs fewer hours and you want every hour to count.
It’s also a good time because the water is cooling off. If you’re going to run a heater this winter, a clean filter matters even more. Low flow from a dirty filter is one of the top reasons a pool heater won’t light.
Common Questions
How long do cartridges last?
Often a couple of years in Phoenix, sometimes longer. Hard water and heavy use wear them out faster. Cleaning them on a regular schedule helps them last longer, since packed dirt and calcium break down the fabric. When the fabric feels thin, the pleats look flat, or you see tears, it’s time for new ones.
Can I just rinse the cartridges without taking the filter apart?
Not really. Backwashing doesn’t work on a cartridge filter. The only way to clean it is to open it up and clean the cartridges by hand.
Do I have to clean my filter if I’m on weekly service?
If you’re on our weekly service, your tech watches the pressure gauge every visit and will let you know when your filter is ready for a cleaning.
Many of our customers sign up for automatic filter cleanings. We clean your filter twice a year, on the schedule your filter’s manufacturer suggests. You don’t have to keep track of it or call us. We just show up and take care of it when it’s time. And you pay less for each filter cleaning when you’re signed up.
How long does a filter cleaning take?
It depends on the size of the filter and how dirty it is. A DIY cleaning usually takes a homeowner an hour or two the first time. It gets faster once you know your filter.
Let Us Handle It
If you’d rather skip the mess, we’ll take care of it. See our pool filter cleaning and repair page or call (623) 526-4945 to set up a visit.